It must be said, however, that there are many types of toilets and each of them has a seat that fits him perfectly.
Therefore I can't indicate a standard procedure valid for all toilets, the seat that I'm going to replace in this article is that of a toilet of Ideal Standard that is very easy to assemble.
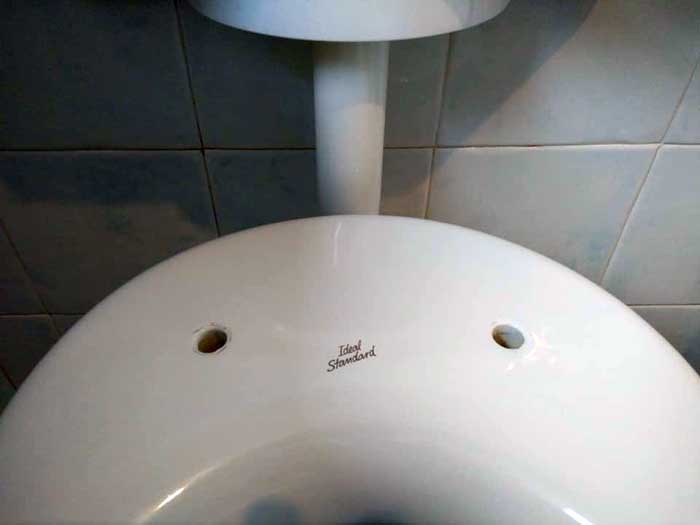
As someone will remember, the Ideal Standard has experienced a complicated period of corporate crisis and today several models of the past are no longer in production.
The same wc model "Fiorile" is no longer available and the seat for this wc, often, is found not as original product with Ideal Standard brand.
So, the toilet seat model Fiorile I found on Amazon, not branded Ideal Standard, at a fairly low price: about 40 Euro.
The original model costs almost twice as much and, in my opinion, not worth it.
This happens for many other brands, often people use non-branded models also to save money.
The difference between the original and the similar model is that the original model has the system of hooking and quick release of the seat.
Frankly, in years, I have never felt the need to unhook the seat because the cleaning is not so uncomfortable to need to unhook the toilet seat.
On the flip side, the seat has happened to unlatch itself when lowering or lifting and that's not particularly pleasant.
These problems do not occur with the non-original toilet seat that has a fixed bracket and that, for this reason, is also much easier to assemble.
As we will see it presents a serious problem that must be corrected but, for almost half the price, I still prefer the non-original model.
But let's proceed in order.
Why does the toilet seat break?

Toilet seats are generally quite strong, the weight certifies their quality but can be, at the same time, the cause of their breakage.
It happens, in fact, that raising or lowering the toilet seat, it can slip out of hand and not having a system of gradual release can slam violently on the toilet bowl.
This does not usually result in the breakage of the toilet seat, but may result in the breakage of the plastic toilet seat bumpers.
When even just one of the toilet seat bumpers breaks, you need to take immediate action because when you sit down, the weight is no longer properly distributed and this can crack the seat, first, and then break it.
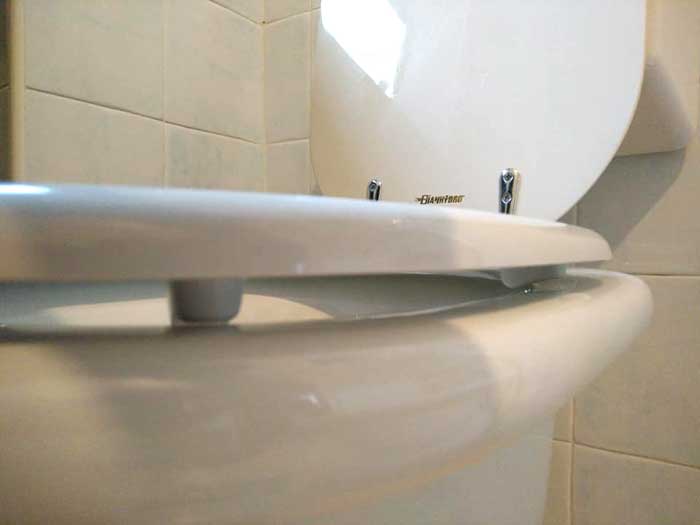
As you can see from the opening photo, this is what happened to this toilet seat, which, for too long, was not replaced a missing seat bumper.
This specific toilet, then, has flared edges also don't ensure the proper support of the toilet seat.
Removing the old toilet seat
Lubricate the fixing screws

The toilet seat, as mentioned, is not often removed; indeed, almost never.
The screws that secure it come into contact with water, detergents and so on and, in the long run, end up oxidizing and blocking.
For this reason, the first thing to do, if we want to disassemble the toilet seat, is to lubricate the screws and nuts that hold it fixed.
We can use Svitol or WD40, the important thing is to abound and let the product act.
Choosing the right wrenches from the toolbox

The second thing to do is to take our toolbox and find the right wrenches to unscrew the screws.
Generally, two wrenches are always needed: a wrench that holds the nut of the screw and a screwdriver that unscrews the screw, using only one will not achieve any result.
Toilets are almost always positioned between the wall and the bidet and this makes it particularly complicated to visually reach the lower part of the toilet.
For this we can use a mirror that will help us to understand what kind of screw holds the toilet seat in place.

At this point we take our wrenches and unscrew the locking system of both holes.
The screwdriver you see in the picture below is almost never the right choice, much better to use a fork wrench, for the lower nut, and a socket wrench with ratchet for the screw of the upper part.

With the toilet seat removed, we clean the area thoroughly, also to remove the presence of the previously sprayed lubricant.
Preparing your new toilet seat
When you buy a new toilet seat it obviously comes with everything you need to attach it, but not with instructions. At least in my case.
However, it doesn't take long to understand how to prepare it, also because, as already written, compared to the original "Fiorile" toilet seat, it doesn't have the quick coupling/uncoupling system.

First, we attach the two big screws to the hinge of the toilet seat. Simply screw them on completely and by hand.

Next, we put the appropriate plastic washers over the holes on the toilet.
These washers serve to prevent the metal part of the hinge from coming into direct contact with the ceramic and to limit the infiltration of water through the holes.

Installing the new toilet seat
Now we are ready to place the new seat.
Insert the bolts into the holes in the toilet by passing them through the plastic washers.
Another advantage of this toilet seat is that the hinge spacing is already set, so you don't have to calibrate it like you needed to do with the original seat.

Now, in order to avoid the inevitable "gap" inside the holes it is necessary to screw the wing nut at the bottom, nut that is in turn separated from the ceramic thanks to a semi conical spacer that has the function to perfectly center the screws in the holes.


We tighten the two wing nuts well and securely and the job is complete.

Problems of the non-original toilet seat
As you can see in the photos below, the serious problem with this toilet seat cover is that the plastic rear seat bumpers, in fact, do not support at all.
As much as it has been reported to the manufacturer the problem has not been fixed.

The seat bumpers should have been placed more externally to make them rest correctly.
So you have to invent something to make the bumpers rest correctly because this is precisely the cause of the breakage of the old seat.
Give the seat the right inclination

In this case it is not necessary, but in others it is important that the seat, in the raised position, has the right inclination, that is, it does not risk lowering unintentionally and break, banging on the ceramics.